
Diesel
Members
-
Joined
-
Last visited
-
I had somewhat of a similar idea except it involved a 26kw whole home generator that feeds the home's electrical panel. I wanted to reduce non-essential loads during a power outage when running on generator. Essentially load shedding. My solution was a Shelly EM-1 (WiFi) with 2 x 120A probes on the generator's supply lines into the transfer switch. Tells me exactly how much load in watts, kW, or Amps the house is drawing on the generator. Based on that I can define very granular load shedding in Home Assistant and resume certain loads when that load drops below a threshold for a sustained period. It worked out really well, but that got me into thinking - hey, it would be really helpful to know exactly what load draws are for most of the individual circuits in our home in real time. So I also installed an Emporia Vue Energy monitor in my main panel. 2 x 200A probes on the mains and 16 50A probes to monitor 16 of the most active circuits in my home. Connected that into the Energy Monitoring in Home Assistant and it gave all kinds of graphs, charts, and data in real time.
-
Neither. Essentially IoX only enumerates the PLM at boot up. When IoX starts at boot up it opens comms with the PLM serial device, identifies the PLM type and address, then establishes a session and caches that state internally. After that IoX doesn't continuously re-enumerate or poll the PLM's presence. Only ways to reinitialize the PLM again is by running a Restore Modem, manually restarting the IoX service, or a full reboot. If you try connecting a healthy PLM after boot up is completed and IoX is started, it wont detect the PLM until one of the above happens.
-
Your last remaining error seems to be a ghost from a legacy IoX auto-update mechanism that UD stopped using years ago. The error flag is most likely stored in IoX's config flag rather than a table which is why the Restore PLM worked to clear all the others, but not this one. Download a backup in Admin Console and then restore ISY with that backup. The legacy error flag shouldn't carry over in the backup so it should be gone for good.
-
Seems like the app's DB is corrupted. It's trying to add a Polisy UUID during sync that already exists. Delete Polisy in Settings | Controllers. Then Add Controller - Local or Portal however you normally connect. Log back in and run Sync.
-
The error popups are old historical persisted error records trapped inside IoX that never got cleared. Essentially ghosts from the past. IoX replays them every time the Admin Console connects. The issue isn't in your Java cache. It's stored... and currently trapped in IoX. Try running a Restore Modem (PLM). It should force IoX to rebuild its internal tables and clear the stale error states permanently.
-
Well done! Glad to help
-
If you're not familiar or comfortable in SSH reach out to UDI for support. Otherwise proceed at your own risk..... SSH into Polisy using your current admin password. ssh admin@<polisy-ip> Stop IoX and PG3 sudo service isy stop sudo service pg3 stop Remove the entire IoX configuration (devices, programs, Z-Wave/Insteon data, certs, etc.) sudo rm -rf /usr/local/isy Remove all Polyglot / node server data sudo rm -rf /var/polyglot Remove portal credentials and association sudo rm -rf /var/polyglot Reset network settings back to default DHCP sudo rm -f /etc/wpa_supplicant.conf sudo rm -f /etc/network/interfaces Reboot Polisy sudo reboot After factory reset credentials will default to admin/admin
-
Hi, I'm not sure what's really on your mind, but I sense from your posts that you're very concerned about something. Although it's unclear what that is. A few of the architectural conclusions in your post don’t match how the current platforms actually work. On Eisy, the controller does not run bare-metal firmware. Eisy runs FreeBSD as a full host operating system. IoX and PG3x are user-space services started by the OS at boot, just like any other daemon. This is why you can SSH into Eisy and see standard BSD processes, services, filesystem, and package manager. On older hardware like the ISY99 and ISY994, the controller was much closer to firmware-style embedded software. That’s likely where your impression comes from. Elk module vs PGx, this was mostly a historical product strategy shift rather than a technical limitation. The Elk module was compiled directly into the 994 firmware. Polyglot came later as a way to externalize integrations instead of baking them into firmware, which is what eventually led to node servers replacing modules. Conceptually, it's reasonable to say the same IoX lineage runs from ISY99 through Eisy. But today IoX is a process running on top of FreeBSD rather than being the entire device image as it was on the earlier controllers. That's why IoX can be restarted independently of the box and why PG3x continues running when IoX is restarted. That separation didn't exist on the ISY99 and ISY994. PG3x is not a small helper module inside IoX. It's a separate service running alongside IoX on the operating system. Its roles are to host and run node servers as separate processes, provide the store, install, and update interface, handle licensing checks with UD’s portal, and translate node server data into nodes that IoX can consume through its API. PG3x communicates with IoX over local APIs and sockets. IoX itself is blind to whether a node originated from Insteon, Z-Wave, or a node server. Licensing does involve communication with UD’s portal, but the node servers and PG3x runtime operate fully locally. Portal credentials are stored locally so the Eisy can authenticate to UD’s portal for remote access and license validation for paid node servers. There's no indication that PG3x streams device data to UD. Node servers run locally and communicate locally with IoX. So.... what's troubling you?
-
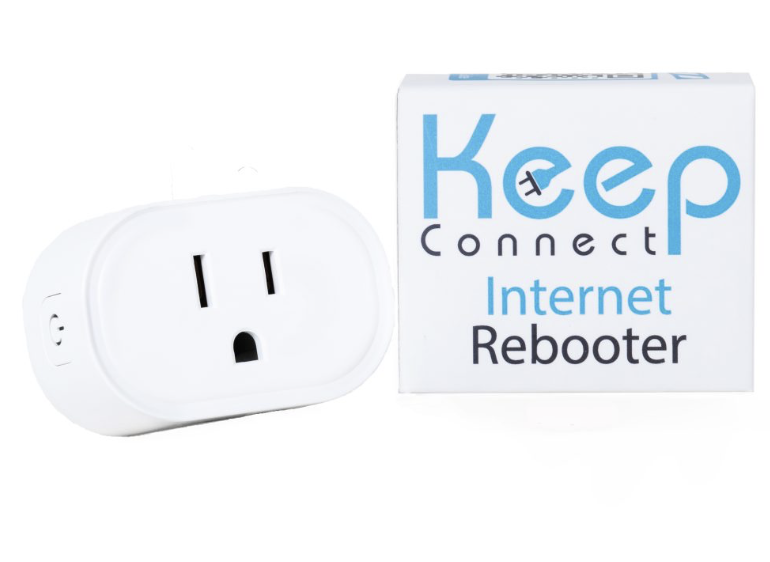
Smart outlet with hardware built-in watchdog that monitors your gateway connectivity Keep Connect | Automatic Router Rebooter Rebooter Pro – Automatic Router and Modem Rebooter Also possible to reboot most modems with a curl command. For example for Aaris Surfboard cable modems curl -u admin:password http://<modem ip>/goform/Goform_Reboot (Replace admin:password with your credentials).
-
Create 3 scenes. Don't control individual devices. Scene A - All basement lights you want turned ON with keypad button X Scene B - All the OTHER basement lights NOT in Scene A you want turned OFF with keypad button X Scene Basement KPD X LED - include only the keypad X button as a responder Create 2 programs KPD X basement lights ON If Basement KPD X is switched On Then Set Scene A On KPD X basement lights OFF If Basement KPD lights is switched Off Then Set Scene A Off Set Scene B Off Optional - 2 Programs for Keypad LED Trackers that also show if any lights are ON anywhere in the basement Basement Lights Status LED ON If KPD X Status is Off And Basement Light 1 Status is not 0.000% Or Basement Light 2 Status is not 0.000% Or ......add as many OR ....Status is not 0.000% as needed Then Set Scene Status Basement KPD X LED On Basement Lights Status LED OFF If KPD X Status is not Off And Basement Light 1 Status is 0.000% Or Basement Light 2 Status is 0.000% Or ......add as many OR ....Status is 0.000% as needed Then Set Scene Status Basement KPD X LED Off
-
There was an announcement a few days ago that Polisy is nearing EOL and in maintenance mode. I would keep your Polisy on 5.9.1 and eventually upgrade to Eisy when you're ready.
-
@dbwarner5 If memory serves, S2 was introduced in 2017. Most Yale locks were S0 before 2018. If your lock is really 10 years old it won't support S2. You can always look up the model spec. S0 is slow & chatty. S2 is quieter, faster, better battery management, and more reliable. To pair an S2 supported lock it needs to be paired close to the main controller using either a QR code or manual DSK entry. Sorry, I don't have a Z-wave radio on my Eisy since I moved all my Zwave & Zigbee devices to Hubitat a long while back. But maybe check Z-Wave-Tools-Z-Wave Diagnostics-Node Information and look for COMMAND_CLASS_SECURITY. If it's 0x98 then it's S0, if 0x9F then it's S2. But hey, if the locks are working like they should sometimes ignorance really is bliss!
-
@dbwarner5 The SECURITY=True flag in Xray only means the lock is encrypted. It doesn’t distinguish between S0 and S2. To confirm S2, you'd need to see COMMAND_CLASS_SECURITY_2 (0x9F) or S2 Access Control listed. Eisy + Zooz 800 stick improves inclusion reliability, but it doesn’t eliminate the need for close proximity during first-time S2 pairing. Including locks next to the main controller is still the most reliable way to ensure a clean S2 handshake.
-
Hey, Not sure what brand/model Zwave locks you have, but for secure S2 pairing they need to be right next to the main controller when pairing the locks the 1st time. Then move the locks to their final location and repair network. I had to do this with 3 locks a few years ago when I changed Zwave control from ISY to Hubitat. It was just easier to buy a cheap 75ft ethernet cable off Amazon and temporarily move Hubitat to the locks during S2 pairing then taking 3 locks off the doors. Waiting for decent matter locks to materialize so I can be done with Zwave once and for all.
-
@sjenkins Very nicely done. Great work! Thank you


