
GDavis01
Members
-
Joined
-
Last visited
-
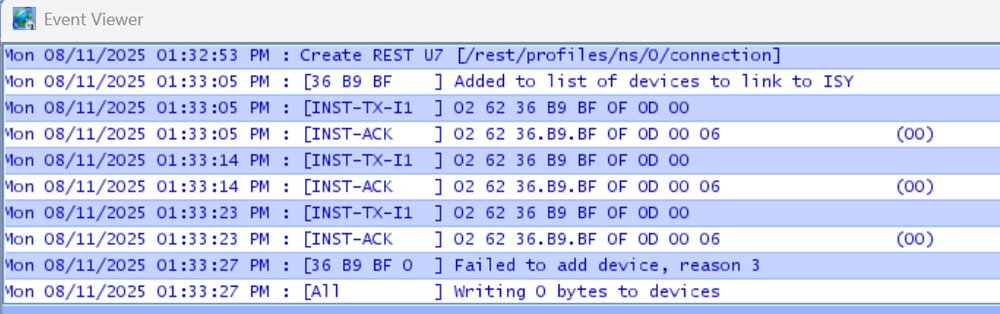
I have tried the factory reset process several times and I still get the same results. I just tried to link the sensor with the Event Viewer running and here is what I see: I understand that I should see, in the viewer, - Inst-TX; - Inst-RX; and then, - Inst-SRX It doesn't seem to be getting past the Inst-TX. I'm not sure what that really means but it does not appear to be good!
-
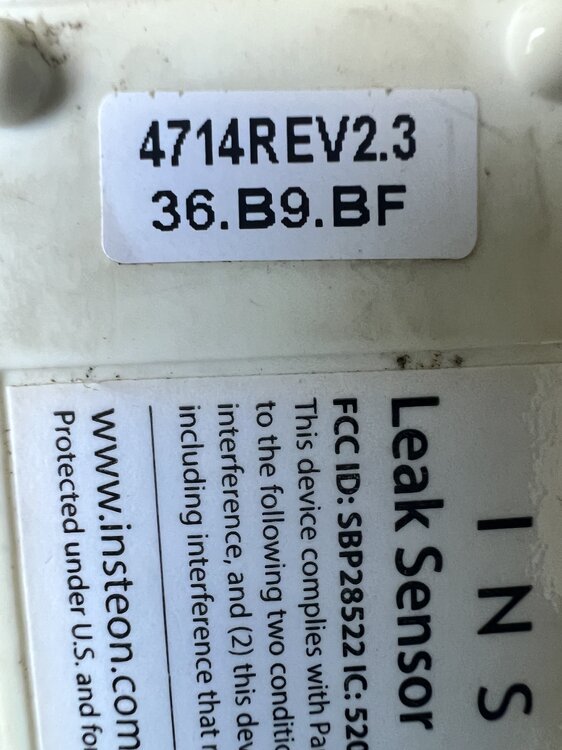
Yes, I typed in the Insteon address. The New Device Error box in my previous post shows the address I typed in. My device clearly shows the address as 36.B9.BF (see pic attached). However, I did go ahead and try every combination of replacing the B's with 0's and 8's but each attempt resulted in the same error. See above for the incorrect address issue and I have the sensor about 3 feet from the PLM as I try to link it.
-
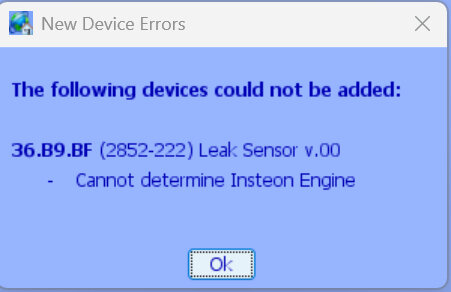
As a follow up to my last post. The linking method using the 'Link a Sensor => Leak Sensor' method instead of the 'Start Linking' icon worked for the Leak Sensor that was still in a box. However, when I tried to link the one that I have been using for several years, I received an error... "Cannot determine Insteon Engine" (see screenshot). Any idea on why this is coming up? Note that after getting this I tried resetting the sensor and retried the linking but got the same result.
-
I was clicking on the Start Linking icon... however, after reading your post, I tried 'Link a Sensor => Leak Sensor' and it worked well. I did not realize that the method for linking wireless devices was different! Thanks
-
Yes, after doing a reset, I pressed the linking button for several seconds until it starts to blink quickly. Before doing that, in the Admin Console I clicked on the Link icon which opened up the 'Linking in Process' box. However, after doing these steps the system doesn't connect to the Leak Sensor! (note that the system does link other devices). Any other thoughts?
-
I migrated some time ago to an EISY from the ISY and I am now getting around to adding certain devices that were running on the ISY. I have been trying to link a Leak Sensor (2852-222) which was working on the ISY but without success. I changed the battery; then followed the reset process (remove battery => wait 5-10 seconds => press the link button while inserting the battery => hold until the light goes to solid green and then turns off); and then went through the linking process. However, the EISY doesn't show any device linking! I had another Leak Sensor still in a box, so I pulled that out and tried to link that too but again the EISY doesn't see the device. Any thoughts on what I may be doing wrong?
-
Great! Thanks
-
I understand that this is possible (is it?) but I cannot figure out how to do it. Any help would be appreciated
-
Thanks for the replies. I went ahead and reset the EISY to factory. The system appears to now be working well and I am in the process of reprogramming.
-
Thanks for the replies. I had forgotten to select 'Follow Topic' so I didn't actually see them all until a little while ago! To close the loop on this thread and a couple of other related ones... I tried the migration from the backup of the dead ISY to the previously used EISY and I'm not sure why but I had a lot of issues with the result! (none of the 3 keypads worked, other than the Main button connected to the load; some programs worked, some didn't; scenes didn't work; some devices on the UD Mobile app would show a status that didn't correspond to the actual device...etc). I could have submitted a ticket but I only had a very limited amount of time at this location so I decided to do a clean install to get the devices connected to the EISY and then do the programming remotely. I factory reset both the EISY and PLM. Initially I could not get the PLM to connect and tried that it could take numerous PLM unplugging and EISY reboots, but it eventually turned out that after the factory reset of the EISY the system setting for Insteon Support was not checked! I then connected the key devices to the EISY (20 so far) and will connect the others (10 – 15) when I’m there next. We are building an additional housing area on the property and so I will also be adding more devices there (+12) that I had previously been used at our former main home. (Our new home has Control4 which is another issue!!) The programming will be fairly time consuming but I saved the programs from the admin console of the failed migration so I at least have something to work from. A good lesson learned is that I should do backups more often because the last backup was quite old and missed a lot of the programming tweaks I have done over time! On the other hand, it is also an opportunity to clean up the programming that I no longer use and perhaps rethink my logic in some areas. Now to deal with a few comments… - I used the PLM from the former main home and I did do a factory reset. The PLM is a 2413U which I bought with the EISY in 2023. - My system is all Insteon, there were no ZWave devices My system seems to be working well and now just needs some work on the programming and network resources.
-
I have posted a few topics recently because my old ISY completely dies and I tried to replace it with an EISY that I had previously used at another home. I went through the process but I ran into far too many problems and I now think the best way forward is to do a clean install of the EISY. So, I am looking for some guidance on how I get the EISY / PLM back to factory state so I don't have any lingering issues. .
-
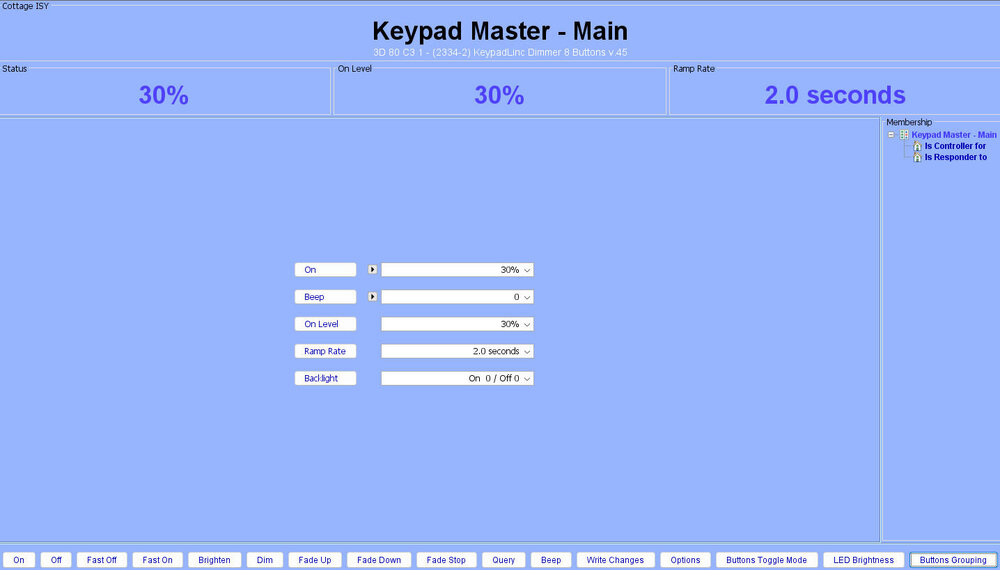
Yesterday, I migrated my system from a dead ISY (at 5.0.16C) to an EISY which I had previously had in another home. I upgraded the EISY to 5.9.1 before restoring from an old backup of the ISY. It essentially worked (sadly I wasn't diligent with my backups so it was a much older backup than I would have liked!). However, what does not seem to be working are my 3 (8 button) keypads. The main keypad buttons which are connected to the loads do work, however the other buttons do not seem to be doing anything. I have been away from programming the ISY for some time but I think my programming is correct and I am wondering if there is something else I should be tweaking or was this a migration issue. I will post a few pics and include the programs I am using for one button on one of the keypads. This keypad button (B) controls a lamp module. I have also set up a scene for the button's LED. Here are the programs: ================================================================== Key.B - Master Lamp - [ID 0050][Parent 004A] Folder Conditions for 'Key.B - Master Lamp' If - No Conditions - (To add one, press 'Schedule' or 'Condition') Then Allow the programs in this folder to run. ----------------------------------------------------------------------------------- DoubleClick FAST OFF Master Lamp - [ID 004F][Parent 0050] If 'Keypad Master - Main / Key Master - B' is switched Fast Off Then Set 'Master Lamp' Fast Off Else - No Actions - (To add one, press 'Action') If the keypad button is double-clicked, when the lamp is on, then Turn OFF the Master Lamp ----------------------------------------------------------------------------------- DoubleClick FAST ON Master Lamp - [ID 004E][Parent 0050] If 'Keypad Master - Main / Key Master - B' is switched Fast On Then Set 'Master Lamp' Fast On Else - No Actions - (To add one, press 'Action') If the keypad button is double-clicked, when the lamp is off, then Turn ON the Master Lamp ----------------------------------------------------------------------------------- Keypad.B Update LED - [ID 0051][Parent 0050] If 'Master Lamp' Status is not Off Then Wait 1 second Set 'Keypad Master - B' On Else Wait 1 second Set 'Keypad Master - B' Off This program updates the status of the LED on the keypad. Keypad Master – B is a scene to control the LED. ----------------------------------------------------------------------------------- Turn OFF Master Lamp - [ID 004D][Parent 0050] If 'Keypad Master - Main / Key Master - B' is switched Off Then Set 'Master Lamp' Off Else - No Actions - (To add one, press 'Action') When the keypad button B is pressed once, while the lamp is on, the Master Lamp is turned off following the ramp rate set up for the device. ----------------------------------------------------------------------------------- Turn ON Master Lamp - [ID 004C][Parent 0050] If 'Keypad Master - Main / Key Master - B' is switched On Then Set 'Master Lamp' On Else - No Actions - (To add one, press 'Action') When the keypad button B is pressed once, while the lamp is off, the Master Lamp is turned on following the ramp rate set up for the device. I am also attaching screenshots of the keypad's Main button's settings; of the 'B' button's settings; and the LED scene settings. Does anyone have any suggestions on what may be wrong here or why this isn't working?


-
Thanks for the reply. After I posted my note I was reading about some of the issues related to running the Update Packages command. Have these been resolved? You are right about the Restore PLM command... I have been away from the ISY for too long I forgot the terminology! So, as you say I probably should Delete PLM to get rid of the links before I do the migration and then afterwards Restore PLM to establish the proper links on the PLM.
-
I recently arrived at my vacation home to find that my trusty ISY (5.0.16) had died, which explained why I had lost any remote access. I want to migrate the system to an EISY (5.8.0) that I had been using at my main home until we moved last year. The EISY has an active portal license. I also have a backup config file for the ISY. I only have Insteon devices. I am curious about a few things before i proceed: - I see that the latest firmware is 5.9.1 whereas I am at 5.8. Is it always advisable to update the EISY beforehand? (Update Packages) - The fact that the EISY was used at another home with different devices should I restore the PLM before I start the migration? The WiKi seems to suggest that I should only do this after I Restore ISY. - I am also assuming that restoring from the back up to the ISY will delete any traces of the installation I previously had on the EISY... is that correct?
-
Thanks for the replies. I took the advice and didn't hook up my old ISY. It turn out that this was a false alarm! While I was away I started having issues with the system and eventually opened a support ticket to which Michel Kohanim replied. I had sent him my error log and he replied that my PLM was dead. When I returned on Saturday I just assumed it was dead and that I needed a new one. However, just before I clicked on the purchase of a new one I decided to go look at the existing PLM. I saw that the LED on the side of the PLM was not lit! The PLM wasn't dead after all, my problem was that the PLM was not properly plugged into the outlet!


