


DNewkirk
Members
-
Joined
-
Last visited
-
The ability to present as main node and "subnode" is defined by the node. If a node has a defined parent (or child), right clicking on the node will include "Group Nodes" among the options. Choosing this option will move the subnode to be below the main node, where the tree can then be collapsed to show only the main node. This is not to be confused with the ability to "Add to Group". There has been some discussion to change the nomenclature of combining nodes and subnodes for clarity. I am not sure what controls if the nodes/subnodes are grouped by default. Some node servers generate main nodes with subnodes that are introduced into IoX with heirarchy, while some seem to come in flat (i.e. with the subnode next to the node rather than below it). One beta node server I have used (LG ThinQ by @TJF1960 ) came in heirarchal in EISY-UI and flat in AC in my installation for some reason. Dave
-
@Javi Continuing our side discussion started in https://forum.universal-devices.com/topic/47304-no-scenes-in-eisy-ui/, my understanding of the programmatic intent is as follows (please correct any misinterpretations I have made): Groups: Are a collection of various nodes that have been associated together to act in concert. They appear in the node tree in IoX as a separate entity and contain other nodes, some defined as controllers of the group and others defined as responders to the group. Groups can have multiple controllers and multiple responders. They are analogous to what were referred to as Scenes in Administrative Console. Scenes: Are a defined subset of a group, associated with a specific group controller, which specifies the on level or other parameters of the responders in the group when the group is activated from that controller. Scenes are designated by the group controller which activates them, have no separate name, and do not appear in the IoX node tree as separate entities. Every controller assigned to a group has an associated scene, which by default contains all responders and controller/responders in the group at an on level of On or 100%. When the first node (controller or responder) is added to a group, IoX creates a virtual controller of the group (with a name to match the group) which also has an associated scene. The virtual controller's scene is invoked whenever the group is controlled programmatically by IoX, and the scene associated with a specific controller is invoked whenever the group is triggered by that physical controller (switch, keypad button, mini module, etc.) Since IoX (and Insteon) need to know what you want to happen when you press a physical button, every physical controller can only be assigned (as a controller) to one group, and therefore has only one scene associated with it. Although every controller's default scene that is assigned when the controller is added to a group contains all responders at full brightness, each scene can subsequently be modified in EISY-UI (and in AC). Each responder in a scene can have its brightness, ramp rate and retries changed. Responders in the group can effectively be eliminated from a scene entirely by setting their on level to off, even while they remain in the group. It should also be noted that these scenes are implemented in native Insteon commands (at least for Insteon nodes) and will therefore continue to operate in the absence of IoX and the EISY controller. Implementation of scenes can also be mimicked programmatically in IoX by creating programs that set individual on level for each desired responder node. A couple of suggestions for future updates to EISY-UI to reinforce these distinctions:Right clicking a node in the EISY-UI node list brings up the option to "Add to Group". Subsequent dialog boxes, including the Scene Selector and Add to Scene should be changed to Group Selector and Add to Group. Throughout EISY-UI (and UD Mobile for that matter) most references to Scenes should be changed to Groups. Since Scenes are not separate entities, they don't actually appear anywhere in the node tree. In generic Insteon linking (i.e. without a hub or controller), the linking process actually creates a group and automatically modifies the associated controller scene since the responder is linked to the controller at whatever on level the responder is currently set to. In IoX, the addition of a controller to a group sets its scene at full on for all responders. Similarly, adding a responder sets it at full on for all controllers. This is understandable, since the association is being made remote from the physical entities and if a controller were added to a group when all of the responders were turned off it would appear that the linking failed since none of the responders would come on with the controller. However, to reinforce the availability and customizability of scenes, it would be desirable to add an additional radio button to the Add to Group dialog box so that when a node is added, a separate option allows the user to "Customize Associated Scenes". Leaving this unselected would preserve the existing behavior: all responders would be added at full brightness to new controllers and new responders would be added at full brightness to existing controller's scenes. However, if Customize Scenes was selected, it would bring up a dialog box listing existing responders (for added controllers) or existing controllers (for added responders) and what their associated levels should be for the added node. It is my impression from forum comments and threads that many users, particularly new users, aren't aware of the possibility of customizing scenes within an IoX group. As you have indicated, this has been further muddied by the nomenclature that has been used in the past. This enhancement (with associated documentation on the wiki) might go a long way to clearing up the confusion on this issue and providing users additional flexibility in the way that they utilize their systems. Dave
-
That might work, although combining them doesn't necessarily collapse the combination as it could still stay expanded in the tree. To me, collapsing is what you do to the tree after they are "grouped". Maybe associate, combine, cluster, or unite? Of these options, I think I am leaning towards associate or cluster, but maybe others can chime in on what terminology would be clear to them. Dave
-
@Javi I appreciate this explanation. I was confused by the switch from scenes (which has been referenced by every resource up to now, including the forums, wiki and even Insteon documentation) to groups. I understand now what you are trying to clarify. You might also give some thought to how to refer to devices or nodes that have "subnodes". Right now, this is also referred to as grouping nodes in Eisy-UI, not to be confused with groups previously scenes. Some other term might be better for this consolidation of subnodes under the prime node, although I can't come up with any recommendations off hand. Dave
-
@Jimbo.Automates Thank you, Jimbo. 2.0.20 installed and appears to have addressed the noted issues. Dave
-
@Javi Thanks for the explanation. I know that eventually the point will be moot, but I was just curious if my current (6.1.2_7) installation of AC was corrupted, or if this is by design (or more accurately, purposeful omission) in AC. You have answered my question. Dave
-
I recently installed my first I3 device (an I3 dial) in my Insteon network. I am using an EISY on the latest production version of IoX/Eisy-UI (6.1.2_7/1.2.2) so I installed it through Administrative Console. After installation, I could see both the I3 dial and I3 dial flags nodes, but when I click on the I3 dial node, AC would not show any data, and I could not control the light. Clicking on the I3 flag node would correctly populate the various flag values. I also could not select the I3 node when trying to control this light via a program. In Eisy-UI 1.2.2 I can see the I3 dial node and flag node values and control the light. I know that AC is going away, and the Eisy-UI is the up and coming way of managing Insteon devices, but is this normal with the 6.1.2_7 AC console or is my installation missing some type of configuration file? I was under the impression that I3 devices could be fully managed under the current iteration of the AC. Any insight would be appreciated. Thanks, Dave
-
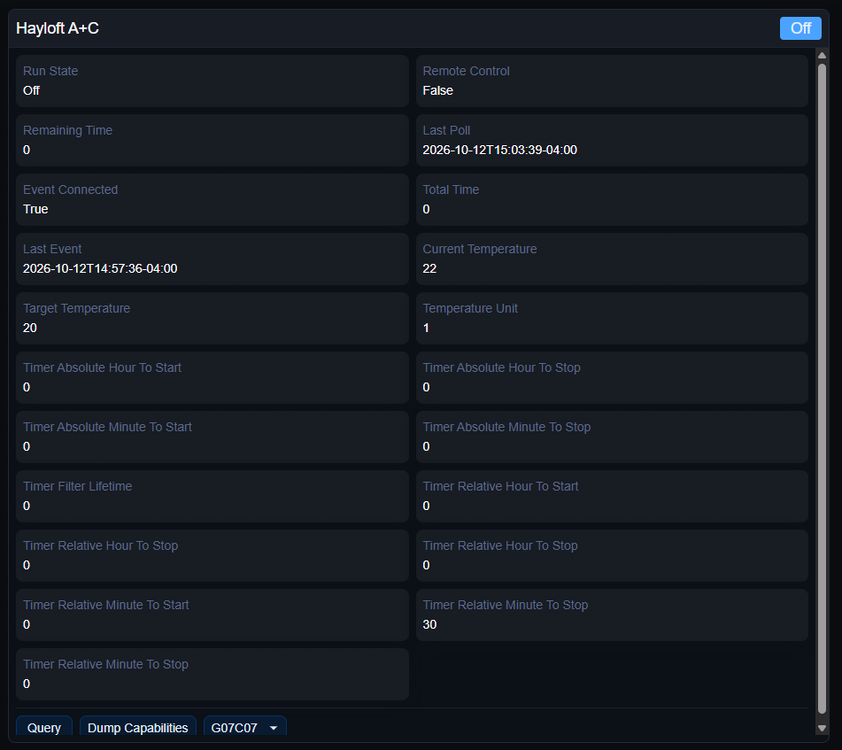
Log files sent via PM. Log files no longer contained previous installation, so I stopped and deleted the node server and reinstalled at 10:08:14 this morning in the logs. The ThinQ node server is installed in slot 5. I also temporarily stopped the Ambient weather node server in slot 3 to reduce the entries in the log files, since that NS updates about 20 values every minute. Reinstallation went smoothly and nodes appeared in IoX. After installation, I modified a number of settings on the unit (through the ThinQ app) to see what the affect on the node values would be. On/off updates relatively quickly, and consistently updates if the node is queried, as do current temperature and target temperature (in Celsius). Interestingly, most of the timer values seem to update when set, and will update as the time counts down, but will not reset after the unit or timer is switched off. GV15/GV18 appear to correspond to what the unit calls Sleep Timer. GV14/GV17 correspond to the unit's "One Time Schedule" start and GV16/GV19 correspond to the unit's "One Time Schedule" start. Setting a recurring schedule on the unit does not appear to affect any of the node values. As my unit is a heat pump, it has mode in addition to on/off, and changing the mode from heat to cool does not appear to be reflected anywhere in the node. Let me know if you need anything else. Dave
-
@TJF1960 I installed the Beta LG ThinQ plugin to give it a try and provide some feedback. The only LG appliance I have attached to my ThinQ account is an LSN120HSV4 mini split inside wall unit with a PCRCUDT3 Wifi module. The ThinQ app identifies it as a Wall-Mounted A/C. Plugin installed correctly and connected to my ThinQ account after I created and input my thinq_pat. The Plugin created a "LG ThinQ" node with a subnode for my A/C unit. Unit data seems to populate correctly, although the plugin at this point offers no control, just reporting for my unit. Data reported as follows: If I turn the unit on, the Run State correctly updates. Updates take a couple of minutes, or immediately if you Query. If I set the sleep timer, the "Timer Relative Minute to Stop" in the right hand column updates (although when I turn it off, this doesn't reset, probably because the unit doesn't report a reset on this event). Note that both the current temperature and target temperature report in Celsius, with no option to change. Since GV7 is the target temperature, I thought that I could change the target temperature by using the G07C07 command at the bottom, but this doesn't seem to affect the target temp. I am currently on the production IoX 6.1.2_7 and PG3x 3.4.26. I installed the plugin through the PG3 console, not through EISY-ui, although it appears in EISY-ui. Hope this helps your development. Let me know if you have any questions on my install.
-
Email sent
-
If I am not mistaken, I think it is actually http://your-isy-ip-address:8080/WEB/admin.jnlp on the ISY. If that doesn't work, try removing the port (i.e.":8080") from the ip address.
-
The "notification" I referred to is a notice that pops up on the HomeKitHub PG3 page in Eisy-UI in a light colored box (I am colorblind, so I can't tell you the color). It automatically clears after two long polling periods. I'm glad the instructions helped.
-
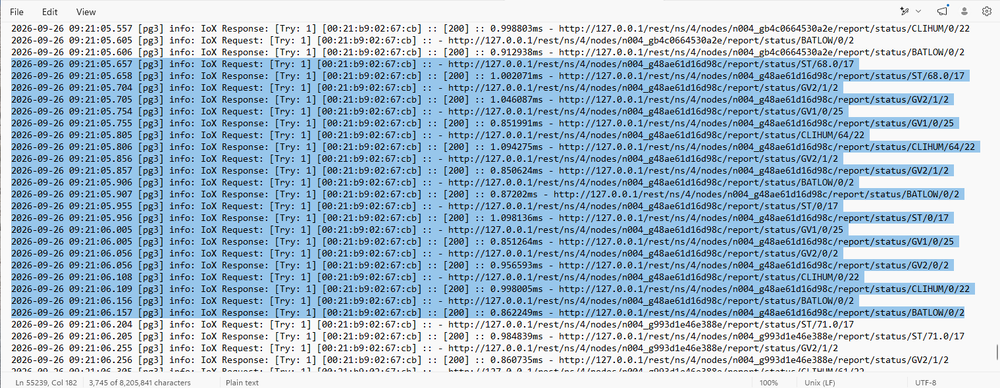
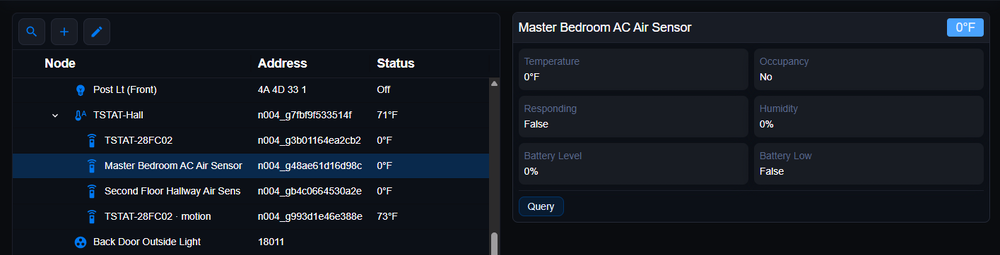
@Jimbo.Automates I am using the HomeKitHub PG3 Professional edition plugin to access my Honeywell T9 Thermostats. Some of my thermostats have connected air sensors. The Plugin creates subnodes for the air sensors, however the data displayed in the IoX nodes is not correct, typically 0s. However, if I query the subnode in EISY-UI and watch the screen, the correct values appear in the subnode for a split second and then revert to 0. When I check the log file, this appears to be confirmed by double entries for the subnode. A set of IoX responses with the correct values appear, and then 1/2 second later, a second set of responses appear with a 0 values. See log excerpt: This same pattern of behavior appears across all of the thermostat subnodes. This seems to indicate that the plugin can correctly read the subnode values, but for some reason is immediately overwriting them. The first values which appear match what the thermostat is displaying so they appear valid and accurate. The other issue I have noticed is that the values of the main nodes don't appear to be updating regularly. I can click on the node and query it to update, but its values are not current when I open AC, EISY-UI or UD Mobile. My shortpoll and longpoll are 60/600 as is the default, but I don't see updates in the PG3 logs unless I run a query. Are the regular updates written to the PG3 log file, or are they not supposed to be logged? Any help you can provide to resolve these issues would be helpful. Thanks, Dave
-
For anyone trying to link to Honeywell thermostats, see also https://forum.universal-devices.com/topic/46803-attention-honeywell-users/#findComment-407514
-
@hawk4974 I had the Honeywell plugin but couldn't get a developer account from Honeywell to use the plugin. I assume that they have stopped issuing them since they were bought by (or bought) first alert and are consolidating their apps and products. I gave up on the plugin. I installed the HomekitHub V2.0.17 and have eight Honeywell T9 thermostats working with it. You need to use the professional version of HomekitHub and enable the generic frameworks in the configuration screen, both under custom parameters "generic_nodes_enable" (change to true) and under the last line of each Homekit pairing slot under "Create generic IoX control nodes (Professional)" (also set to true). Discovery only worked for 3 of my thermostats with older firmware. The newer ones I purchased wouldn't show up in discovery, whether they were in Homekit Discovery mode or not. To get them to connect to HomeKitHub, I looked up the thermostats in my router to get their IP address and network name. I then manually added them in HomeKit pairing slots filling in slot number (use next available), HomeKit pairing code (choose Connect to Homekit on your thermostat and write down the eight digit number), the Name substring (network name: TSTAT-XXXXXX where XXXXXX is the last 6 digits of the mac address), LAN host:port (ip address + :80, i.e. 192.168.1.100:80), stable node key can be left blank, and final entry should be "true". Save the configuration, wait several minutes, and then restart the plugin. Sometimes, I had to restart several times. Eventually you should get a notification when the plugin restarts either that it paired with a 12 digit address (which looks like a mac address, but isn't) or a notification that the device rejected the Homekit code. I am not sure, but I think that it won't make the initial connection until the thermostat times out and leaves Discovery mode, but then the Homekit code is no longer valid. If you get the second notice, then go back into the thermostat and get a new Homekit code (they change every time you go into Connect to Homekit) and update the Homekit pairing code in the configuration and save the changes. Restart if necessary. Once you get the notification that it paired, copy the 12 digit address from the notification and update the Accessory id in the HomeKit pairing slot for the device on the configuration page so it can find it again next time. When pairing is successful, it will create multiple nodes. The one you have (TSTAT-DFF263) under HomeKit Hub only indicates the pairing status (and it isn't always accurate- sometimes mine said it was paired when it wasn't). It will also create an additional TSTAT-DFF263 at the IoX level with subnodes under it. The subnodes will be called "TSTAT-DFF263" and "TSAT-DFF263-motion" (or some of them on mine were "T9 thermostat-motion"). It will also create subnodes for any room sensors you have connected to the thermostat. In my case, all of the relevant information and controls were in the TSTAT node under IoX. Although there are parameters under each of the subnodes, the populated data was not correct. I tried changing the generic nodes to false and it eliminated the subnodes, but the data under the main node was then no longer correct and the controls didn't work. You can verify that the thermostat paired by going back to the thermostat and choosing Connect to Homekit. It should tell you that pairing was successful. If it gives you a new code, the pairing has not succeeded. If for some reason you have to delete this pairing and start over, you can reset Homekit pairing on the thermostat from the Advanced Setup>Reset menu. Once everything is paired and working, you can move the nodes from IoX to the appropriate room or folder you want it to appear in. I also renamed this node in IoX and on the configuration page to something more descriptive and it doesn't seem to have broken the pairing connection, but I only got it working yesterday so time will tell. Dave


