
Everything posted by Guy Lavoie
-
Yes, you could simply move your current Zwave dongle to a new eisy.
-
The r2 is still very new, less than a year old. There is a documented procedure for migrating from the Zooz dongle to the ZMatter dongle...but it doesn't work. Myself and others have not succeeded in doing it. However the Zooz dongle will also work with the eisy, so it's not mandatory that you upgrade to the ZMatter dongle unless you actually want the additional Zigbee functionality. It's also not clear if the ZMatter dongle is still available.
-
Weird that it apparently worked ok for a day. On a lark, I'd try plugging the PLM into a different electrical circuit. Use a long extension cord to have it connected to an outlet elsewhere that you know is working ok with your other devices. I'm just wondering if there is something on your existing circuit that could be killing the signals.
-
-
Happening with both heat pump and AC makes much more sense. Seems to point to the compressor. If the compressor runs on straight line power then you could try noise suppression tricks (ferrite cores, etc). If the compressor is variable speed and driven with electronics, then that could be a challenge. It would be easier to add filtering to the line powering the heat pump.
-
Another possibility could be a bad Insteon device transmitting noise or garbage. You might try turning off one breaker at a time and seeing if it stops the blinking.
-
Tried the same test with just AC? Heating with heatpump?
-
Have tried to go into the event log, level 3, and if there are Insteon signals being sent? I've had a similar thing happen with what appeared to be a feedback loop, possibly between the eisy and sone lights. The lights controlled by 2 switches turned off for a couple of seconds, then back on. Repeatedly. Rebooting the eisy stopped it.
-
Save it, and then also configure your router to reserve the current ip address for that device MAC address.
-
Sounds about right.
-
The first post in this thread details the procedure. The important thing is to power off the controller, as explained:
-
A Polisy has two USB ports, so you should be able to just plug it right in. Yes, the 2413U comes with a standard USB cable.
-
Congrats, you win the odd-one-of-the-week award! Initially I was thinking rf noise, but reading through it all, it would appear that the PLM memory got partially corrupted. If, as you seem to be saying, wireless devices were still able to trigger actions in other devices (as part of scenes) but nothing was seen at the ISY, it seems that links would have somehow been lost in the PLM. If I had suspected this, I would have started with a restore of the PLM. Of course, hindsight is always easier, and I might be totally off here.
-
If the blower is of the ECM type, then that could be a likely source of noise. If the motor is powered by straight 120V AC power and does it's inverter thing internally, then it might be possible to put a noise filter on it, with some wiring. But the blower would be running no matter if the furnace is heating or cooling. And in heat pump mode, the same blower and compressor would be involved, so I can't understand why the noise would only show up in straight cooling, assuming that the same furnace is doing everything.
-
Have you tried it with the ip address as I suggested?
-
Someone in another thread mentioned that it might not be available anymore, possibly to be replaced by something new? It's still listed as being out of stock, but the listed price has now jumped to $452? Not sure where that's going.
-
Tried adding an entry in IoX finder with the ip address directly? Eg: https://192.168.0.123:8443/desc
-
Same thing here: it self upgraded to Alexa+ just a few days ago. So far, things seem to be working. My wife's (lack of) patience quickly lets me know if something is amiss!
-
I noticed a new upissue of 6.0.5. It went from 6.0.5_1 to 6.0.5_10. But the sysconfig.txt file size has shrunk from 29k to 5k. No release notes! Dang, how can they do this to us?! lol The old sysconfig,txt file shows the following release version information: udx: 4.4.0_6 isy: 6.0.5_1 libwebsockets: 4.3.3 eisyui 0.10.1 iox_matter_bridge: 1.3.24 mosquitto: 2.0.18 pg3x: 3.4.16 The new release shows: udx: 4.5.0_7 isy: 6.0.5_10 libwebsockets: 4.3.3 (hasn't changed) tpm2-tools: 5.6_2 (new item) eisyui: 1.0.8_4 iox_matter_bridge: 1.3.24 (hasn't changed) mosquitto: 2.0.18 (hasn't changed) pg3x: 3.4.19 Inquiring minds (well ok...geeks!) want to know!
-
A migration like yours (no Zwave) would be quite straightforward, if you have a good backup. The version you get (r2 vs lite) doesn't really matter on a lighter use system like you appear to have. Yes it's quieter here lately. Maybe due to there being little in terms of new releases. The upcoming thing is Matter, and that will take time. Then again, quiet is usually an indication of stability, not a bad thing.
-
If you're referring to battery powered devices, did you put them in linking mode and then try "restore device"? They need to be done one by one.
-
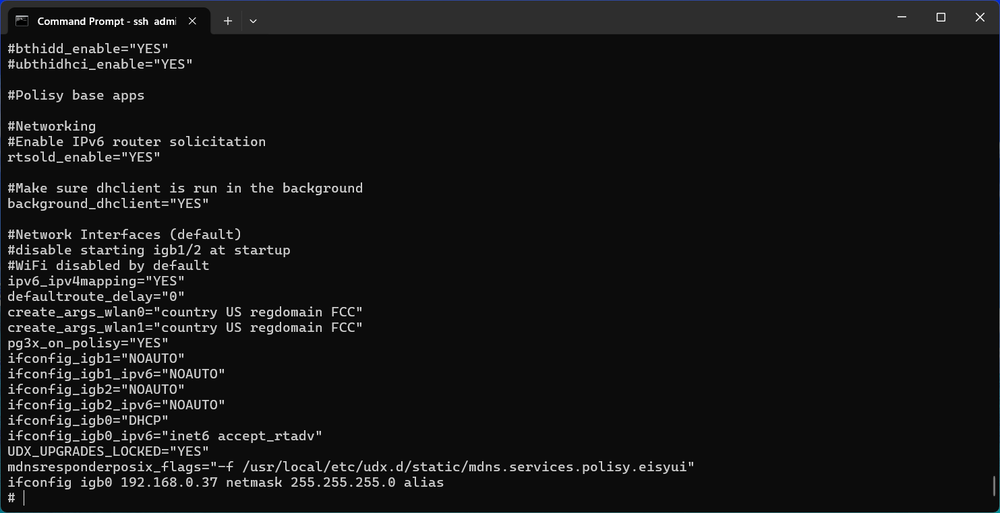
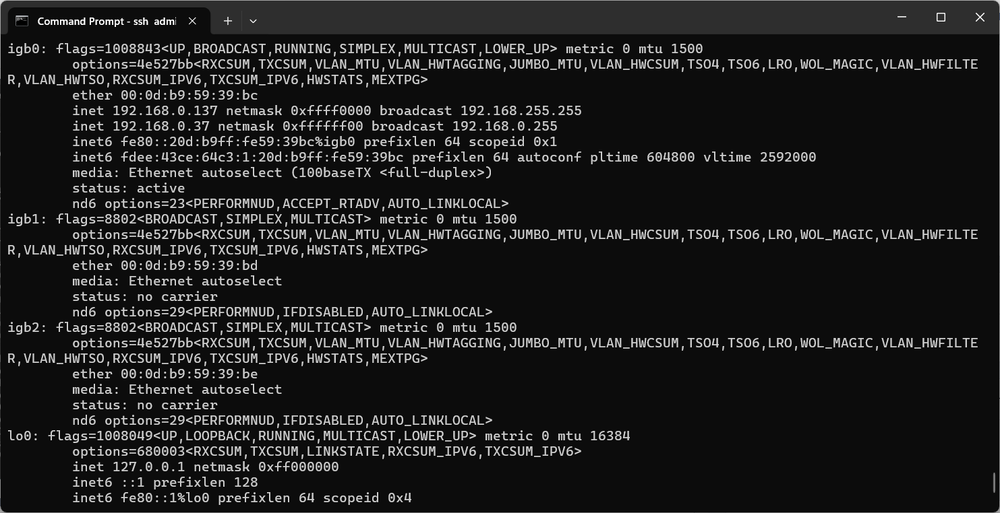
Well I've been trying stuff on one of my test Polisys (I tell you, they really get used), and I just might have a workaround (not a fix) for you. This could also be a nice hack for those who for whatever reason might want a fixed IP address and can't do it with a DHCP reservation. You gotta be ok with going into your controller with ssh to do this. FreeBSD allows you to set more than one IP address for a network interface. The idea here is to let DHCP do it's thing, which keeps UDI happy because the correct default gateway, nameserver, etc settings are acquired. Then you define a second IP address that can be static, as an alias. It only takes one line added to the /etc/rc.conf file. The line is (for a eisy) "ifconfig re0 <fixed IP address> netmask <netmask> alias". The terminating "alias" is of utmost importance! For whatever reason it is suggested that the netmask be different than the default one, so I made it smaller. Here is what the line looks like in my /etc/rc.conf file. Note that this is a Polisy, so the network interface is "igb0" instead of "re0". The last several lines a somewhat different on a eisy. The reserved DHCP IP address for this Polisy is 192.168.0.137, so I made the fixed one 192.168.0.37 to keep it simple. My router's DHCP range is .100 and up. Now if you look at your network configuration with the ifconfig command, you see both addresses, like this: I manually added a new entry in IoX Finder to show the new IP address. It looks like two separate controllers, but with the same UUID. I tested it with admin console, going into PG3, and eisy-ui. All work fine, even after a reboot. An IoX upgrade might delete the added line so you could need to add it back if that happens. Let me know if you or someone else tries this.
-
Get it here. Links are halfway down the page, under "Install"
-
Ah, happiness is 75% decision.
-
As Paul mentioned, cloud dependancy is an entirely different problem, and would be the same problem with integrations on another platform. There seems to be a slight shift towards some manufacturers recognizing that and the frustrations caused. Some like Somfy have opened up local access as a developer mode. Yolink's new hub has local access. Others like the MyQ garage door opener have cut out local access, keeping it only for certain chosen integrations. I hope a general trend towards opnness develops. Time will tell.


